Patterns in Relationship Based Access Control (ReBAC)
Relationships further describe users and resources within an application. Sometimes these relationships tie into the conditions you want to express for controlling access to resources. The table below presents two common relationship types and their use cases.
| Relationship Type | Access Logic | Use Case |
|---|---|---|
| Parent/Child | Permissions to access child resources are inherited from parent resources. | Resource hierarchies: •File/folder •Org charts |
| Groups | Members of a group inherit the permissions of the group. | Group Membership: •IAM roles •Interest Groups |
In order to establish the type of relationships that might occur in your app, make sure you have implemented your basic Roles Based Access Control patterns first. You'll build upon the work there when you start adding relationships.
Resource-Resource Relationships
Fine grained access control
Relationships between resources can be anything. However, hierarchical relationships tend to be most common. As you'll see in the Get Started example below, the pattern presented in Polar is flexible. Simply change the name you give the relationship to make it more meaningful to your use case.
Get Started with Resource-Resource Relationships
Action Items
Modeling a Relationship Between Resources
In this section we'll follow a concrete example using the structure found in Github repositories. The relationships found in this example covers the important variations you'll see within resource-resource relationships.
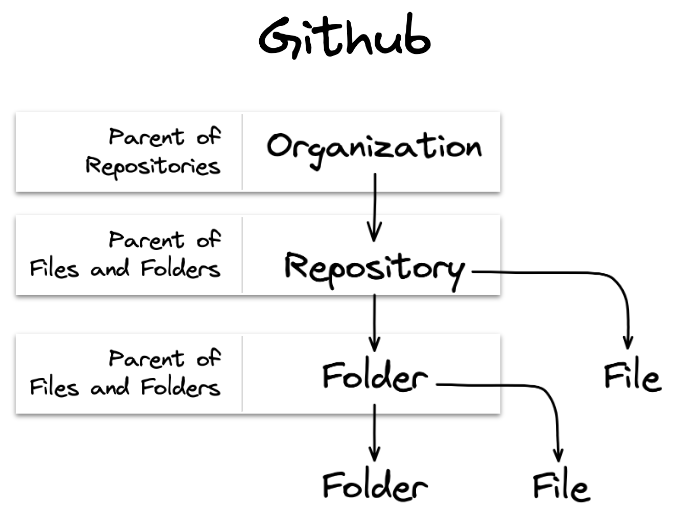
Github repository resource hierarchy. Resources have parent/child relationships with one another. In most cases you > will be interested in inheriting roles or permissions from the top-down. Therefore, we have called out all the > parent relationships because they will be most meaningful when writing your policy.
To simplify the examples we'll focus on just one pair of resource relationships at once.
- First we'll introduce the steps needed using the relationship between Organization and Repository resources.
- Afterwards, we'll discuss the recursive relationship found within Folders.
- Finally, for completeness, we'll provide the relations statement for Files.
Step 1: Add the relation statement
The relation statement does two things:
- It names the relationship between the current resource and another resource
- It defines the type that the other resource must have in order to have this relationship
The relation statement in the code below (right column) uses the name parent_org to describe the relationship Repositories have with Organizations.
Step 2: Use the relationship to assign roles
Roles within the repo can be derived from the relationship with the parent_org. If a user has a certain role on the parent_org, then they can inherit that role (or related roles) on the repository.
Simple Resource Specific Pattern | Resource Specific Pattern with Relationships |
Recursive Relationships
Within the Github example, the folder is a resource that can also contain other folders. To implement recursive relationships simply reference the current resource block type within the relations statement.
Simple Resource Specific Pattern | Resource Specific Pattern with Relationships |
Next Steps
Actor-Actor Relationships
Fine grained access control
Relationships between actors may take on a variety of forms:
- Friend relationships within a social network
- Group membership for identity and access management
- Direct report relationships within an org charts
In most cases, the way you implement the relationship will stay the same. You will likely only change the name to reflect the relationship you are modeling. The main consideration to make is whether or not the relationship needs to have a hierarchical structure.
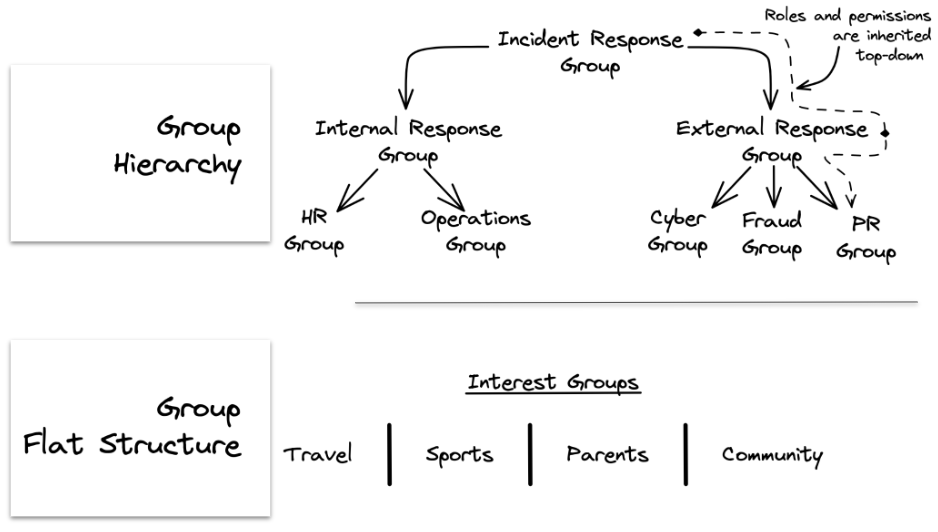
Groups are a convenient way to organize users and other resources. That organizing structure may be > flat, or it may be part of a hierarchy. How we represent the group doesn't change, however, additional information is > needed to express how an individual group is related to the larger structure. ### Get Started with Actor-Actor Relationships
Action Items
Prerequisites
Modeling a Flat Group Structure
To begin, we'll first define a simple resource specific pattern with one lower-level resource (shown in the left column code block). Having roles and permissions already available gives you something tangible for your groups to inherit.
Step 1: Add the Group actor type
In the right column code block you'll see the line
actor Group {}
Adding this to your policy defines a type Group that you can use when adding facts related to groups.
Step 2: Add the longhand rule to inherit roles (or permissions) from a resource
Look for Step 2 in the right column code block below. This step has more nuanced details. Here's what it states:
A user shall have the role ____ if:
- They have been explicitly given the role
- They are part of a group that has been given the role
We'll go through each part of the pattern line-by-line.
-
ruby has_role(user: User, role: String, resource: Resource) ifThe first line defines a conditional rule head:has_role. It allows users to be given roles. The definition ofhas_rolein this context applies to ANY resource we define because it uses theResourcespecializer as the type in the third argument. Now any resource can have its roles assigned to groups. Theifat the end of the line makes the rule conditional on the statements that follow. -ruby group matches Group andThe second line in the pattern declares a variable group of typeGroup. The policy can use this variable when stating other conditions for thehas_rolerule being defined. -
ruby has_group(user, group) andThe third line defines a simple rule statementhas_groupthat accepts aUsertype as its first argument, and aGrouptype for its second argument. This is how users are given their member relationship for a given group. This line allows you to write facts that place users into groups. -
ruby has_role(group, role, resource);The last line defines another simple rule statement:has_role. Thishas_roleis new. Instead ofUsers, it takesGrouptypes for its first argument. This line allows you to write facts that assign roles to groups.
Simple Resource Specific Pattern | Resource Specific Pattern with Flat Group Relationships |
Modeling a Hierarchical Group Structure
To model hierarchical groups, start with the flat group structure discussed above.
The flat group structure pattern (left column code block) can be modified to allow hierarchies by adding conditions to
the has_group rule:
has_group(user: User, group: Group) if sub_group matches Group and has_group(user, sub_group) and has_group(sub_group, group);
In the flat group structure it was sufficient to only write a simple rule statement. Now you need to define all the
conditions that reflect group relationships. Here's the line-by-line description of how the rule works: -
ruby has_group(user: User, group: Group) if
The first line defines a conditional rule head: has_group. It allows you to specify member relationships between
a user and the group they are part of. -
ruby sub_group matches Group and
The second line declares a variable sub_group of type Group. It represents groups that have been defined
as a member of another group (a sub-group). -
ruby has_group(user, sub_group) and
The third line is a rule statement is a recursive call to the rule being defined: has_group. This line is what
provides support modeling the relationship of group hierarchies. Notice that the second argument uses the
sub_group variable instead of the variable group. This is because here we want to establish that a user is a
member of a sub-group, not the parent group. -
ruby has_group(sub_group, group);
The last line is a simple rule statement that accepts Group types for both arguments. This is how groups are
given their member relationship to other groups. This line allows you to write facts that place groups into other
groups.
Resource Specific Pattern with Flat Groups | Resource Specific Pattern with Hierarchical Groups |
Next Steps
Additional Resources
- What's an actor?
- What are actor and resource blocks?
- Relation declarations: short and long form syntax
Talk to an Oso Engineer
If you'd like to learn more about using Oso Cloud in your app or have any questions about this guide, connect with us on Slack. We're happy to help.